
Since starting web development about 4 years ago, I’ve been deploying every commit to a webserver from various build servers. Having an up-to-date webserver with the recent version of your code at all times makes it possible to do early testing on an environment other than your own machine. Since switching from SVN to Git, doing feature branches suddenly became possible (yes, I know about branches in SVN, but it was just too damn hard and slow to work with). Let’s face it; feature branches always caused problems on build servers, because you would have to manually add new project configurations every time a new feature branch was created. With TeamCity 7.1, feature branches are now a well-supported part of the build process, giving you some exciting new possibilities.
At eBay we use Git Flow and setup our build server to deploy every commit on develop to our test environment and every commit on master to our production environment. We have been using feature branches as well, but never really deployed them anywhere. I decided to do something about this, making it possible to do QA on a different environment than localhost. The problem with feature branches is that they, unlike develop and master, are dynamic branches, which are created and removed when needed. Luckily TeamCity now supports dynamic branches as well. The idea here was to create a new website every time a new feature branch is created. For instance, when creating a new feature branch named “feature1”, I would like to be able to access the latest code on this branch by visiting http://feature1.testenvironment/, where testenvironment is the local name of our QA webserver.
I spent some time figuring out how to do it and looked at both various TeamCity features as well as Git hooks. I ended up implementing the website creation using a simple PowerShell script, executed by TeamCity, each time a build is run. For deployment we already use Web Deploy, as this is the obvious choice. My build steps looks like this (simplified):
- Build code
- Create website
- Deploy website
Building the code is simple using MSBuild. To create the website I added a new step like this:
[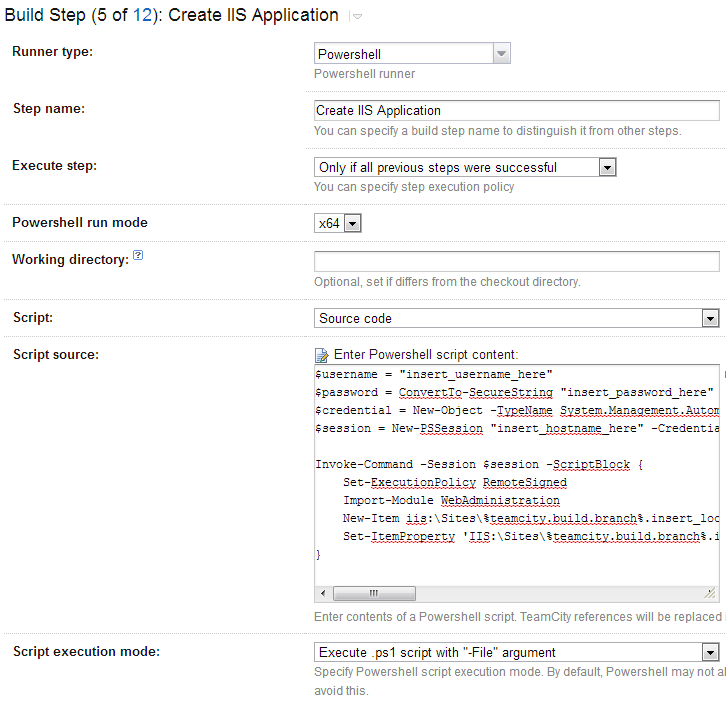
For those of you who don’t like copy/pasting from an image, the script source is available in this Gist. The script creates a remote connection to a webserver. You obvious need to change the hostname and user credentials to match a server at your site with IIS installed. On the server, New-Item is called with parameters expected by that command. Look at the Gist for details. Finally the AppPool is set using the Set-ItemProperty command. Notice the use of the teamcity parameter named %teamcity.build.branch%, which is pretty much where the magic happens. This parameter is assigned the name of the Git feature branch. Very nice!
You may think: “Doesn’t this creates the website every time the project is build?”. Actually it doesn’t. On subsequent runs, the PowerShell script fails. As default TeamCity won’t fail if a PowerShell script fails so I decided to live with this.
The final stage is to deploy the website to our newly created website using Web Deploy. I won’t go into detail on how Web Deploy works (maybe another post, if anyone is interested?). In short the deployment step looks like this:
[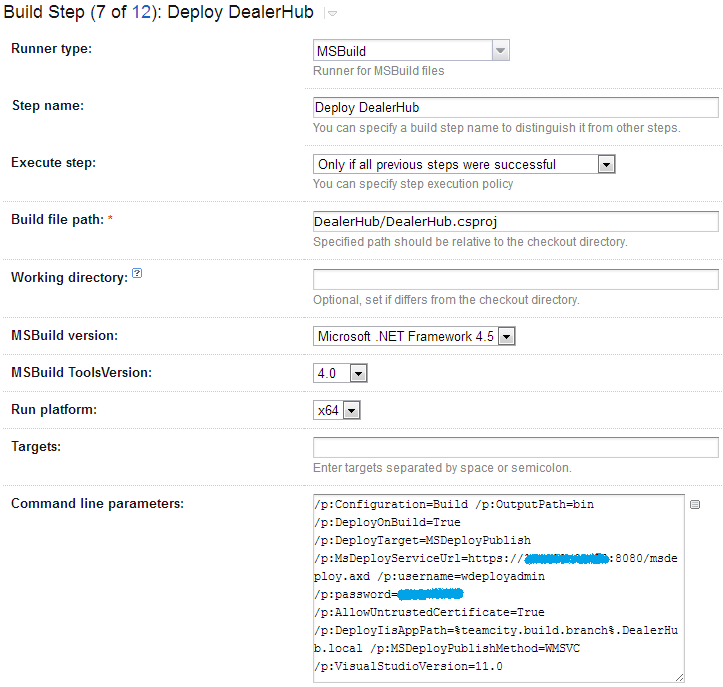
This build step uses MSBuild and Web Deploy to publish the newly build code to the website created in the build step above. Again I use the %teamcity.build.branch% parameters to tell the IIS what website to publish to.